Introduction to Kafka
Apache Kafka is a distributed streaming platform. What exactly does that mean?
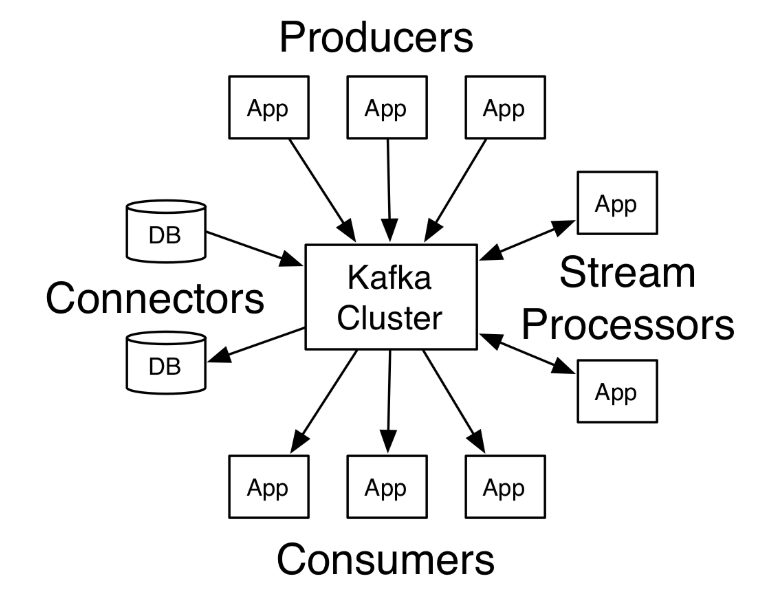
A streaming platform has three key capabilities:
- Publish and subscribe to streams of records, similar to a message queue or enterprise messaging system.
- Store streams of records in a fault-tolerant durable way.
- Process streams of records as they occur.
Kafka is generally used for two broad classes of applications:
- Building real-time streaming data pipelines that reliably get data between systems or applications
- Building real-time streaming applications that transform or react to the streams of data
Kafka cluster and Kafka connect JDBC sinc setup(e.g. For 3 nodes cluster)
Use-Case
In this setup we are going to send data from kafka avro producer to aws aurora mysql database. For this we are using avro converter to convert schema.
Steps to be followed
Step2
- Download confluent on each server using following command
$wget http://packages.confluent.io/archive/4.1/confluent-oss-4.1.0-2.11.tar.gz

$tar –xvf  confluent-oss-4.1.0-2.11.tar.gz'
Step3
- Start the zookeeper on each server using following command.
- Go to the bin location of confluent(form me it’s in root)
$cd /root/confluent-4.1.0/bin

$./zookeeper-server-start  ../etc/kafka/zookeeper.properties
- If it is running on 2181 port then start it in daemon mode as follow
$ ./zookeeper-server-start -daemon ../etc/kafka/zookeeper.properties

$netstat -anp|grep 2181     (for checking, it is running or not)
Step4
Start the kafka server on each server.
Change the following parameters in
server.propertieson each server.It is resides into/root/confluent-4.1.0/etc/kafka/location.broker.id=0 (change for each server as 0,1,2) listeners=PLAINTEXT://hostname or ip address:9092 zookeeper.connect=x.x.x.x:2181,x.x.x.x:2181,x.x.x.x:2181(add other server ip with 2181 port)
Now start kafka server using following command
$ cd /root/confluent-4.1.0/bin

$./kafka-server-start  ../etc/kafka/server.properties
- If it running on port 9092 then again start it in daemon mode as follow
$./kafka-server-start -daemon ../etc/kafka/server.properties

$netstat -anp|grep 9092
Step5
- Check the cluster setup.
- Create a topic on one of the server.
$cd  /storage/confluent-4.1.0/

$./kafka-topics --create --zookeeper x.x.x.x:2181,x.x.x.x:2181,x.x.x.x:2181 -- replication-factor 1 --partitions 1 --topic demotopic
- You can check that topic is created on each server using following command
$./kafka-topics --list --zookeeper x.x.x.x:2181,x.x.x.x:2181,x.x.x.x:2181
It will list topic which is created.
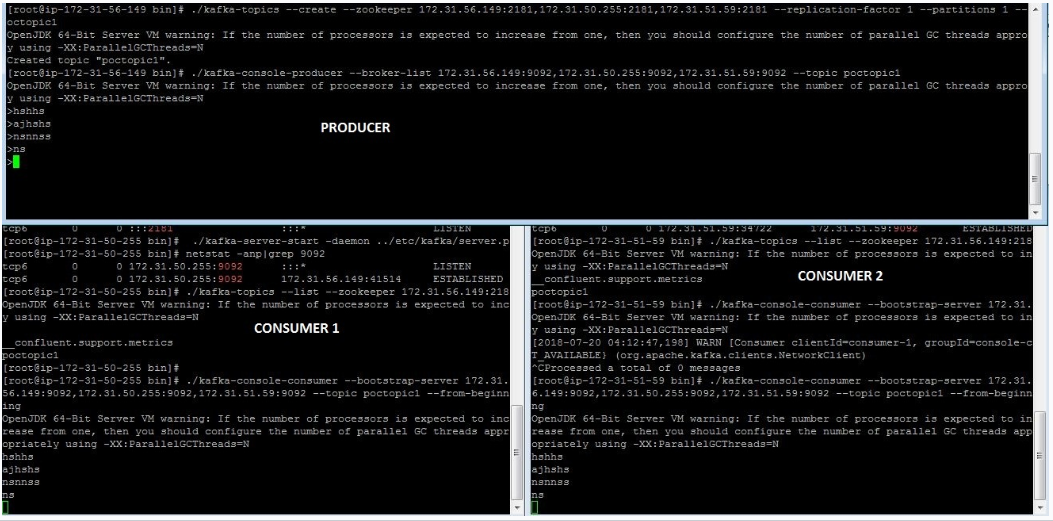
- start the producer in the same terminal of topic
$./kafka-console-producer --broker-list x.x.x.x:9092,x.x.x.x:9092,x.x.x.x:9092 --topic demotopic
- Start the consumer on other two servers
$./bin/kafka-console-consumer --bootstrap-server x.x.x.x:9092,x.x.x.x:9092,x.x.x.x:9092 --topic demotopic --from-beginning
Now you can send the messages from producer and those messages get populated at consumers as follow
Step6
- Install mysql on one of the server and start the mysql service(login to root)
$yum install mysql-server

$service mysqld start
Step7
- Create mysql instance on aws and login to mysql instance as follow
$mysql –h <hostname of mysql instance> -u <username> -p <password>
- Download mysql-connector-java.jar and place it in confluent-4.1.0/share/java/kafka-connect-jdbc/
- For aws mysql connection download following package
$yum list|grep mysql

$wget http://repo.mysql.com/mysql-community-release-el7-5.noarch.rpm

$rpm  -ivh mysql-community-release-el7-5.noarch.rpm
- Set the classpath on one of the server where you want to run schema registry and connect- statndlone
$ export CLASSPATH=$CLASSPATH:.:/root/confluent-4.1.0/share/java/kafka-connect-jdbc/mysql-connector-java-               5.1.46.jar:/root/confluent-4.1.0/share/java/kafka-connect-jdbc/kafka-connect-jdbc-4.1.0.jar

$ export CLASSPATH=/usr/share/java/mysql-connector-java.jar:$CLASSPATH
Step8
- Start schema registry on same server where you set classpath
- Change <kafkastore.bootstrap.servers=PLAINTEXT://x.x.x.x:9092> in “/root/confluent-4.1.0/etc/schema-registry/schema-registry.properties” file.
- Start schema registry as follow
$cd /storage/confluent-4.1.0/bin

$./schema-registry-start ../etc/schema-registry/schema-registry.properties
If is is running on port 8081 then start it in daemon mode
$./schema-registry-start -daemon ../etc/schema-registry/schema-registry.properties

$netstat -anp|grep 8081
Change following parameter in “connect-avro-standalone.properties” file.
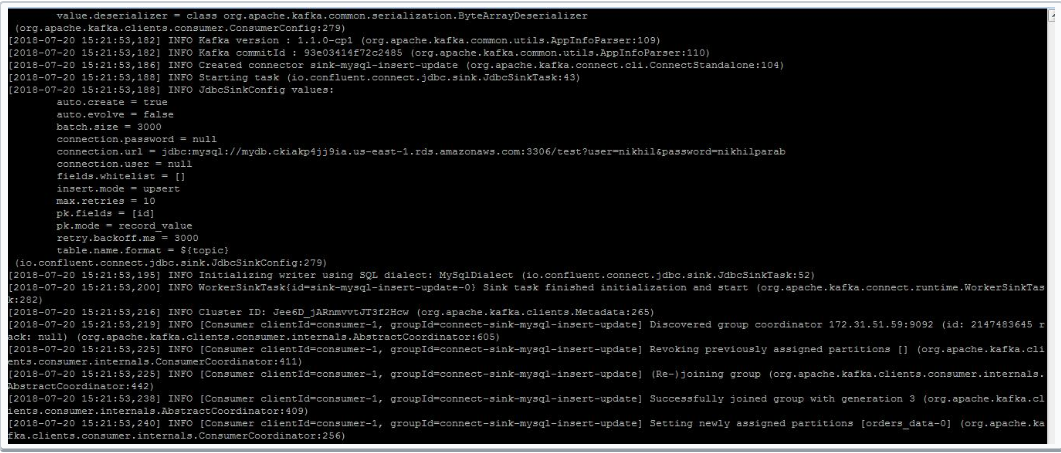
bootstrap.servers=x.x.x.x:9092rest.port=8083create a file at “/root/confluent-4.1.0/etc/kafka-connect-jdbc/sink-mysql-jdbc.properties” with bellow content
name=sink-mysql-insert-updateconnector.class=io.confluent.connect.jdbc.JdbcSinkConnectortasks.max=1topics=orders_dataconnection.url=jdbc:mysql://hostname:3306/test?user=test&password=testauto.create=trueinsert.mode=upsertpk.mode=record_valuepk.fields=id#key.serializer=org.apache.kafka.common.serialization.StringSerializer#key.converter=org.apache.kafka.connect.storage.StringConverterkey.converter=org.apache.kafka.connect.storage.StringConverter#value.converter=org.apache.kafka.connect.storage.StringConverter#key.serializer=io.confluent.kafka.serializers.KafkaAvroSerializer#value.serializer=io.confluent.kafka.serializers.KafkaAvroSerializerStart kafka standalone as follow
$cd /root/confluent-4.1.0/bin

$./connect-standalone  ../etc/schema-registry/connect-avro-standalone.properties  ../etc/kafka-connect-jdbc/sink-mysql-jdbc.properties
- Open another terminal for same server as above and start avro console producer
$cd  confluent-4.1.0/bin

$ ./kafka-avro-console-producer \--broker-list x.x.x.x:9092 --topic orders_data \--property    value.schema='{"type":"record","name":"myrecord","fields":[{"name":"id","type":"float"{"name":"PARTY_TYPE_ID","type":"float"},{"name":"PARTY_DESCRIPTION", "type": "string"},{"name":"PARTY_SHORT_DESCRIPTION", "type": "string"},{"name":"SOURCE_SYSTEM","type": "string"},{"name":"CREATED_DATETIME", "type": "string"}{"name":"MODIFIED_DATETIME","type":"string"}]}'
It will get hang for some time. You have to enter the values as follow
{“id”: 1,”PARTY_TYPE_ID”:100,”PARTY_DESCRIPTION”: “PERSONAL” ,”PARTY_SHORT_DESCRIPTION”:”S”, “SOURCE_SYSTEM”:”sys”,”CREATED_DATETIME”:”2018-07-05”, “MODIFIED_DATETIME”:”2018-07-09”}
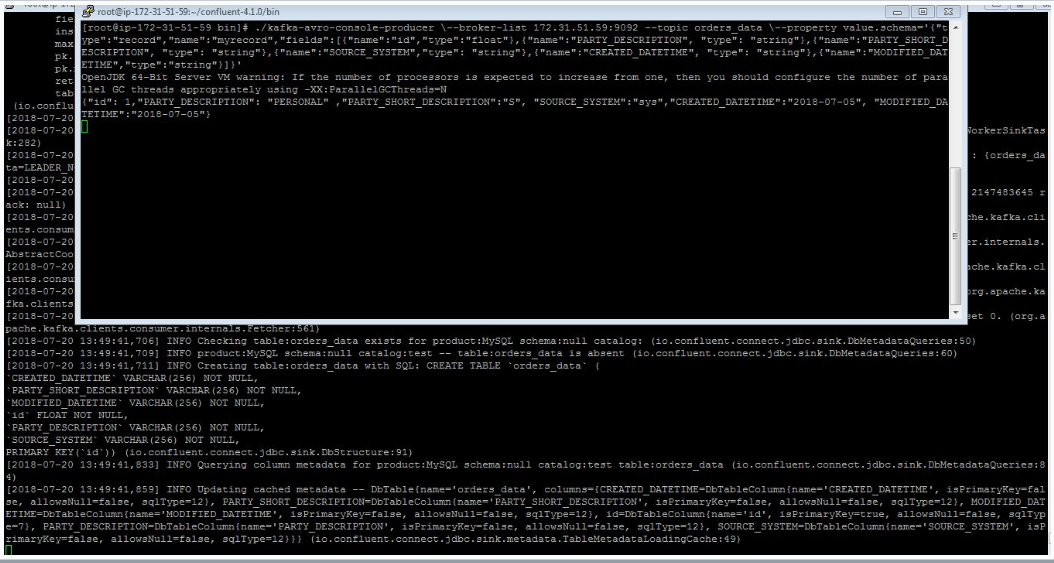
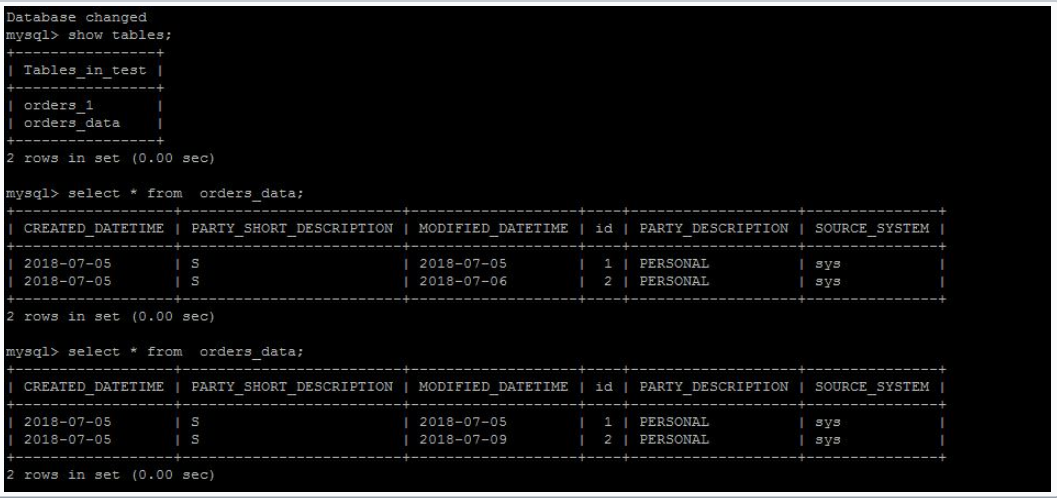
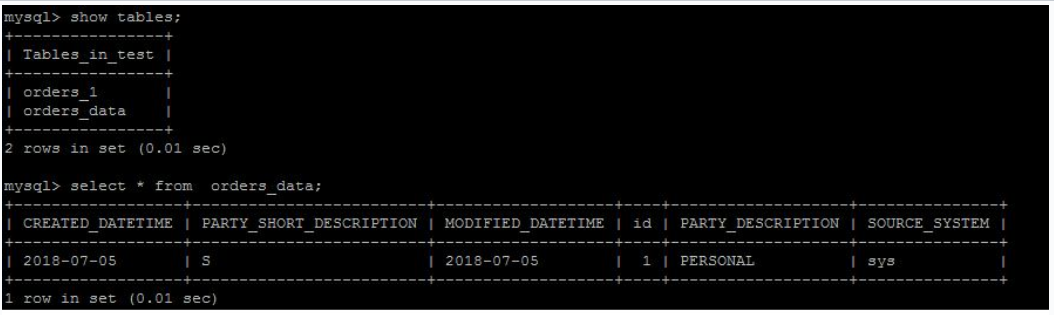
- The table will get create(same as topic name) in mysql. Start the mysql on other server
- You can update the data. Insert the different value for same id. You can see the value get updated in mysql
e.g. Original value of MODIFIED_DATE for id 2 is 2018-07-06
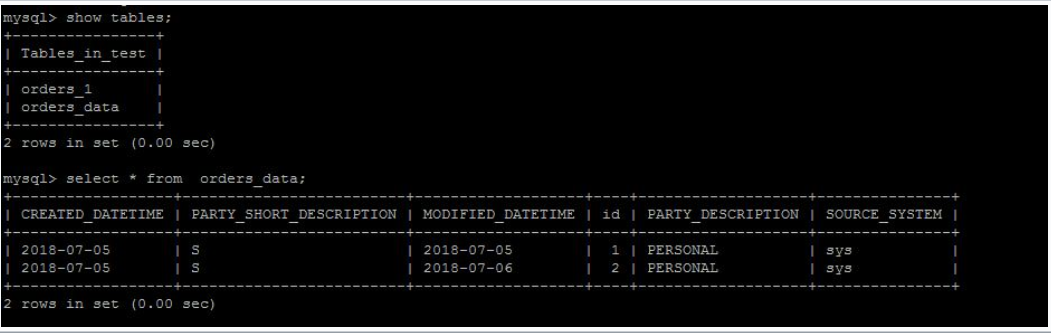
- Updated value